What is Error SI3531
Windows 10/11 Update Troubleshooter
Error SI3531 is a failure code displayed by Windows Update when it cannot download or install an update. The full message typically reads: "Failed to download updates. Error: SI3531". The problem occurs during communication with Microsoft servers or while processing already downloaded files. As a result, the system misses critical security patches and feature improvements.
Main Causes
Error SI3531 rarely occurs without underlying issues. Here are the most common sources of the problem:
- Corruption of the local update cache — the
SoftwareDistributionfolder contains corrupted or incomplete files. - Update service failure — the
wuauserv,bits, orcryptSvcservices are stopped or malfunctioning. - Network blocking — a firewall, corporate policies, or antivirus software blocks access to
*.update.microsoft.com. - Corruption of system components — files responsible for digital signature verification (
catroot2) are damaged. - Insufficient disk space on C: — free space is required to unpack the update.
How to Fix Error SI3531: Step-by-Step Guide
Start with the first method. If it doesn't help, move to the next one. Most cases are resolved within steps 1-3.
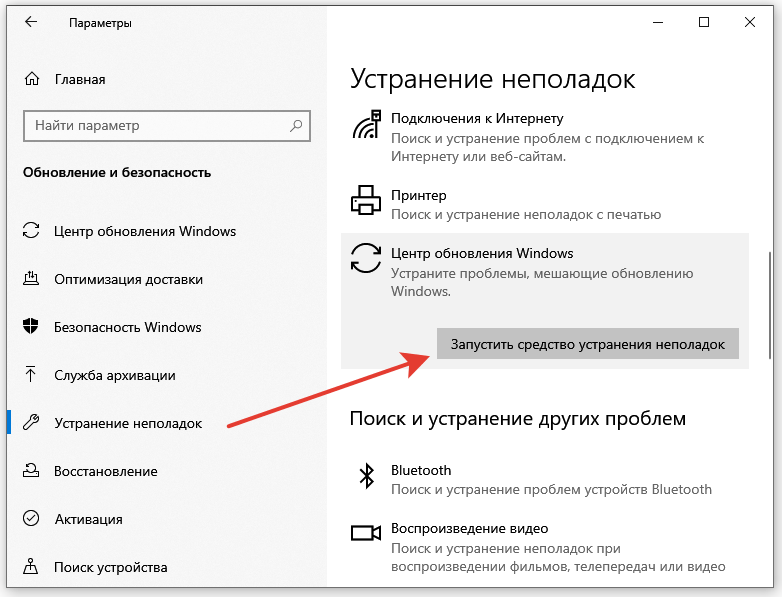
1. Run the Windows Update Troubleshooter
This is the simplest and often most effective method. The built-in tool automatically finds and fixes common issues.
- Open Windows Settings (Win + I).
- Go to System → Troubleshoot → Other troubleshooters.
- Find Windows Update Troubleshooter and click Run.
- Wait for the scan and fixes to complete.
- Restart your computer and try checking for updates again.
2. Manually Clear the Update Cache
If the automatic troubleshooter didn't help, manually delete the corrupted files from the cache.
- Press Win + R, type
services.msc, and press Enter. - In the services list, find Windows Update, right-click, and select Stop.
- Open File Explorer and navigate to
C:\Windows\SoftwareDistribution. - Delete all contents of this folder (files and subfolders). If the system prevents deletion, restart your PC and repeat this step.
- Return to
services.msc, start the Windows Update service. - Check for updates in Settings.
3. Full Reset of Update Services via Command Prompt
This method not only clears the cache but also resets related components.
- Launch Command Prompt or PowerShell as an administrator.
- Type and execute the following commands in strict order, waiting for each to complete:
net stop wuauserv
net stop cryptSvc
net stop bits
net stop msiserver
ren C:\Windows\SoftwareDistribution SoftwareDistribution.old
ren C:\Windows\System32\catroot2 catroot2.old
net start wuauserv
net start cryptSvc
net start bits
net start msiserver
- Restart your computer and check for updates.
4. Check Network Settings and Firewall
Error SI3531 is often related to an inability to connect to update servers.
- Check basic connectivity — open any website in your browser.
- Configure the firewall:
- Open Windows Defender Firewall → "Allow an app through Windows Defender Firewall".
- Ensure
svchost.exeis allowed on both Private and Public networks. - Temporarily disable the firewall for testing (do not leave it disabled for long).
- Disable proxy server: Settings → Network & Internet → Proxy. Uncheck "Use a proxy server".
- Reset the network stack in an administrative Command Prompt:
netsh winsock reset
netsh int ip reset
ipconfig /flushdns
- Restart your PC.
5. Temporarily Disable Antivirus and VPN
Third-party antivirus software or a VPN client can block update traffic.
- Open your antivirus interface (Kaspersky, Avast, ESET, etc.).
- Find settings for real-time protection or web protection and temporarily disable them.
- If you use a VPN service (ExpressVPN, NordVPN, etc.), disconnect it.
- Try checking for updates.
- After a successful installation, be sure to re-enable your antivirus and VPN.
6. Repair System Files (DISM and SFC)
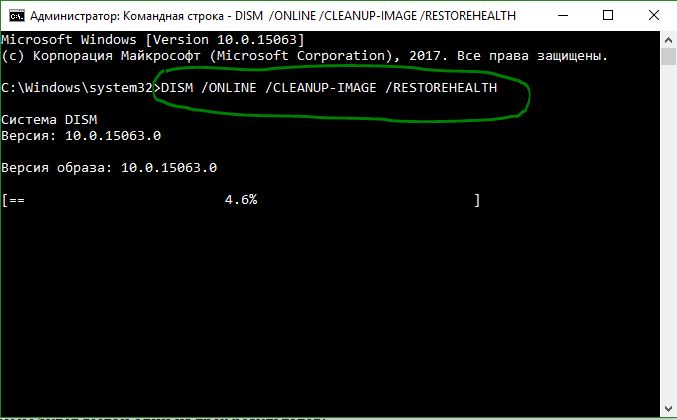
DISM and SFC System File Repair Process
If the error is caused by corrupted system images, these tools can repair them.
- In an administrative Command Prompt, run the DISM command:
DISM /Online /Cleanup-Image /RestoreHealth
The process may take 10-20 minutes. If DISM cannot find repair sources, specify the path to a Windows installation image (e.g., from a USB drive):
DISM /Online /Cleanup-Image /RestoreHealth /Source:E:\Sources\Install.wim:1 /LimitAccess
(replace `E:` with your media's drive letter).
2. After DISM completes, run the file integrity check:
sfc /scannow
- Restart your computer and check for updates again.
Quick Action Summary
| Step | What to Do | Key Considerations |
|---|---|---|
| 1 | Run the troubleshooter | Fastest first step. |
| 2 | Clear SoftwareDistribution folder | Must stop the wuauserv service first. |
| 3 | Reset services via CMD | Execute commands in strict order. |
| 4 | Check network & firewall | Allow svchost.exe and port 443. |
| 5 | Disable antivirus/VPN | Re-enable immediately after update. |
| 6 | Run DISM and SFC | Takes time (15-30 min) and may need install media. |
If none of these methods help, the problem may be deeper—such as registry corruption or driver conflicts. In that case, consider resetting or reinstalling Windows using the Media Creation Tool.