Introduction / Why This Matters
Syncing contacts with Google is a fundamental mechanism that protects your phonebook from data loss. If you lose your phone, factory reset it, or switch to a new device, all entries will be restored automatically. However, glitches in this process are common: the system may stop updating data, display a network error, or save new numbers locally only. This guide will help you quickly diagnose the cause and restore stable cloud storage functionality.
Requirements / Preparation
Before you begin, ensure the following:
- Your device is running Android 10 or later.
- You know your Google account password and can sign in from another device (in case of a lockout).
- A stable Wi-Fi or mobile data connection is active.
- You have owner-level device privileges (Guest mode or a corporate MDM profile may restrict changes).
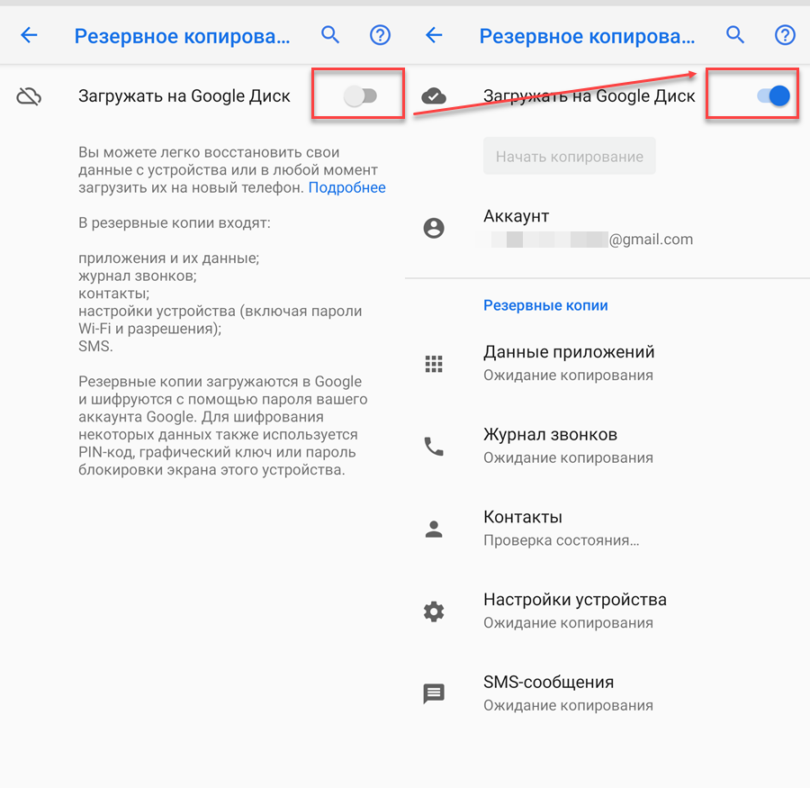
Step 1: Check Sync Status in Account Settings
Google Contacts sync settings in the Android account menu
Smartphone manufacturers frequently change the layout of system menus, but the underlying logic remains the same. Open Settings → Accounts (or Passwords & accounts). Select your Google profile. In the list of syncable data, locate Contacts. If the toggle is off, turn it on.
💡 Tip: On Samsung and Xiaomi interfaces, this option might be labeled
Contacts syncor located within theAccount managementsection.
Step 2: Trigger a Manual Sync
The system updates data on a schedule, but a timer glitch can cause the process to hang. In the same Google account menu, tap the three dots in the top-right corner or scroll down to the Sync now button. Wait for the circular animation to stop. If you see a Sync error. Try again later message, proceed to the next step.
Step 3: Clear System App Cache
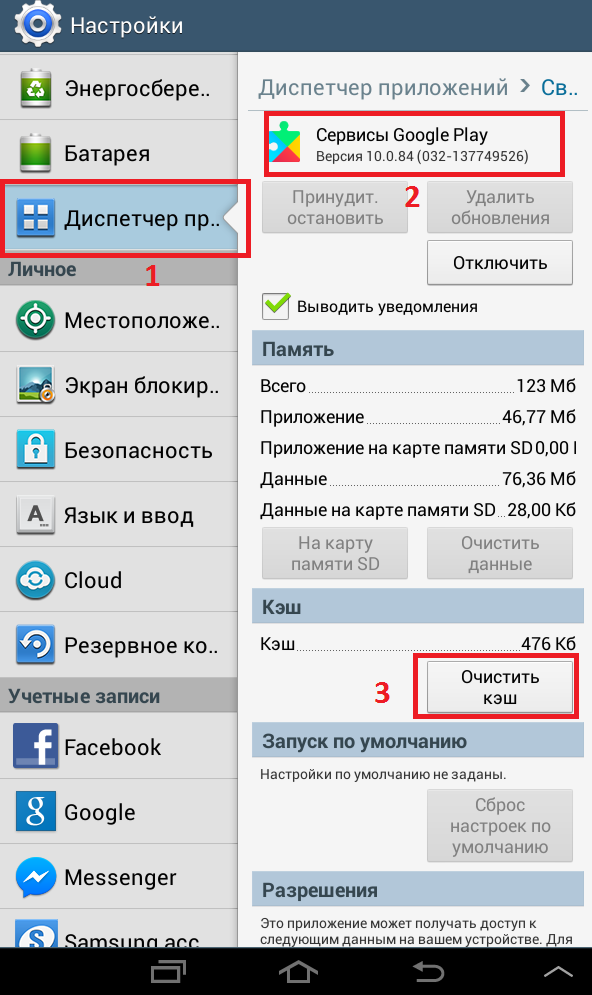
Cache clearing menu for Google Contacts and Play Services apps
Accumulated temporary files often conflict with new requests to Google servers. Go to Settings → Apps → See all apps. In the list, find Google Contacts (or Контакты Google). Open the Storage section and tap Clear cache. Repeat the same process for Google Play Services.
⚠️ Important: Do not tap
Clear dataorDelete data. This will reset local settings and may temporarily hide your entries until the next sync.
Step 4: Ensure Contacts Are Saving to the Cloud
Default account setting for saving contacts in the app
A common reason for "missing" numbers is saving them to the wrong location. Open the default Contacts app → Settings (gear icon) → Manage contacts → Default account. Under Save contacts to account, select your Google profile. All new entries will now automatically sync to the cloud.
Step 5: Disable Aggressive Battery Optimization
Android restricts background activity to conserve battery. If the system "kills" sync processes, data won't update. Go to Settings → Battery → Battery optimization → All apps. Find Google Play Services and Google Contacts, then select Don't optimize. This will allow them to run in the background without restrictions.
Verifying the Results
Open a browser and navigate to contacts.google.com. Sign in with the same account and compare the number of entries with your phone. In the account settings on your phone, the status next to Contacts should change to Synced just now or Updated. If the numbers match and the status shows no errors, the process has been successfully restored.
Troubleshooting / Common Issues
- Error: "Sync is temporarily disabled": Check your system date and time. If they are incorrect, Google's SSL certificates will fail validation, blocking the connection. Enable
Use network-provided time. - Duplicate entries: Identical contact cards may appear after restoration. In the
Contactsapp, open theManage contactsmenu →Merge duplicates. The system will automatically merge entries with matching names or phone numbers. - Corporate profile blocking access: If the device is enrolled in a work account via Microsoft Intune or Google Workspace, the administrator may have disabled personal contact sync. In this case, contact your company's IT department to adjust the security policies.