What is the "failed to enable SIP" error and why does it occur?

Typical error message when a manual attempt to enable SIP via csrutil fails
The error "failed to enable System Integrity Protection" appears when macOS cannot activate system integrity protection. This happens either during a manual attempt to enable it via terminal (sudo csrutil enable) in normal mode, or automatically after a system update.
Full error text in the terminal:
Failed to enable System Integrity Protection. Please restart your computer and try again.
System Integrity Protection (SIP) is a core security mechanism that restricts access, even for the root account, to critical system files and folders. Its malfunction reduces your Mac's protection against malware and can cause system instability.
Main Causes
Example output of the System Integrity Protection status check command
- Conflict with low-level software: Kernel drivers (kext), hardware tuning utilities, or antivirus software can block SIP from functioning.
- System volume corruption: A failed update or an improper shutdown can damage files protected by SIP.
- Incorrect bootloader state: Issues with the Recovery partition or NVRAM settings can prevent SIP policies from being applied at startup.
- Previous manual disablement: If SIP was disabled to install specific software, its configuration might have been corrupted.
How to Fix the SIP Enablement Error
Success message for enabling System Integrity Protection after running csrutil enable
Method 1: Force Enable via Recovery Mode (Primary)
This is the standard and most effective method. The csrutil command is only available in the recovery environment.
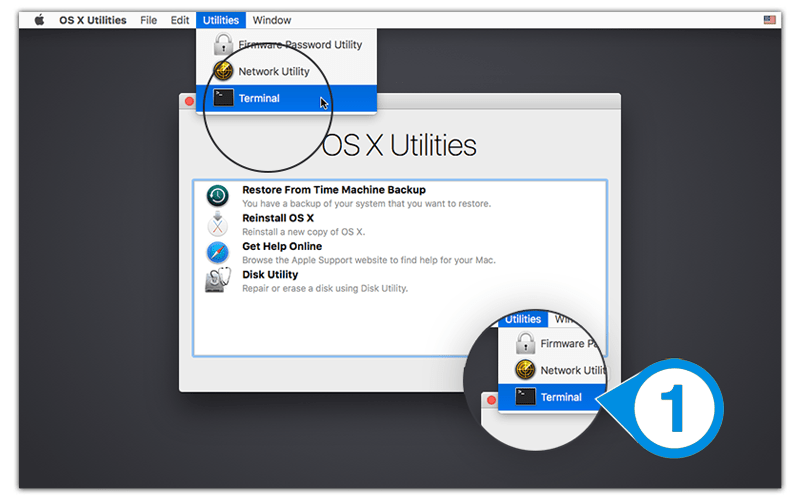
- Boot into Recovery Mode. Shut down your Mac. Turn it on and immediately hold Command (⌘) + R. Wait for the macOS Utilities window to appear.
- Open Terminal. From the top menu bar, select Utilities → Terminal.
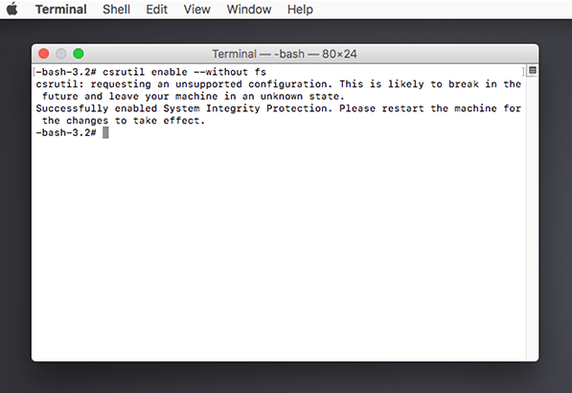
- Verify SIP is disabled. Type
csrutil status. If the system is protected, you will seeenabled. If it showsdisabled— proceed. - Enable SIP. Type the command:
Press Enter. A successful execution will display the messagecsrutil enableSuccessfully enabled System Integrity Protection.. - Reboot. Close the terminal and select Restart from the Utilities menu.
⚠️ Important: Only run the
csrutilcommand from within Recovery Mode. In normal macOS operation, this utility is not available.
Method 2: Reset Boot Settings (NVRAM/PRAM and SMC)
If the issue is caused by incorrectly cached boot settings.
- For all Macs (NVRAM/PRAM reset): Shut down your Mac. Turn it on and immediately hold Option + Command (⌘) + P + R for about 20 seconds. The Mac will restart.
- For Intel-based Macs (SMC reset): The process varies by model (laptop with/without battery, desktop). Refer to Apple's official documentation.
- For Apple Silicon Macs: SMC does not exist; resetting NVRAM is done by restarting while holding the power button for 10 seconds when the Mac is off.
After the reset, repeat Method 1.
Method 3: Reinstall macOS
If SIP fails to enable due to severe system file corruption.
- Boot into Recovery Mode (Command + R).
- In the macOS Utilities window, select Reinstall macOS.
- Follow the on-screen instructions. The process will install a fresh copy of the system over your current one, preserving your data.
- After completion, SIP will be active by default. Check the status in normal mode:
csrutil status.
Preventing SIP Problems
- Re-enable SIP immediately after completing tasks that required it to be disabled (e.g., installing certain drivers).
- Install low-level software only from trusted sources and ensure it is compatible with your version of macOS.
- Regularly create backups using Time Machine. This simplifies recovery in case of serious failures.
- Before updating macOS, check the compatibility of critical utilities and drivers with the new system version.